Treat a missing packet as a location-specific observation
A gap in RTP sequence numbers means the selected trace lacks part of that stream. It does not, by itself, identify which network device dropped traffic or whether the recording process missed it. Begin by writing down the capture location, interface, filter, snap length, start time and method used to obtain the file.
Check whether the capture spans the call phase where the user heard a problem. A recording that starts mid-call is not evidence that earlier packets were lost.
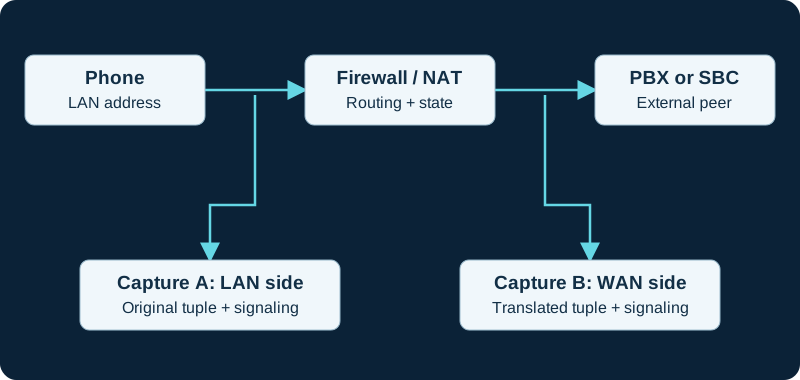
Paired observations help locate a change or loss. Account for clock offset, NAT and capture drops before attributing a difference to the network.
Check the capture path itself
Review the capture tool’s packet-drop report and any available capture-interface statistics. A busy mirror port, oversubscribed capture host, restrictive filter or storage limit can affect what is recorded. Do not combine the tool’s drop counter with RTP loss as though they measured the same thing.
When using rolling files, retain the files on both sides of the event and verify their time coverage. The Wireshark documentation describes ring-buffer file rotation; a missing earlier file is a retention gap, not a network incident.
Compare the same stream at two points
Use synchronized, bounded captures before and after the suspected boundary. Match direction, endpoints, SSRC and sequence progression; account for a PBX that terminates and regenerates RTP. Comparing unrelated legs as though they were identical packets produces a false loss claim.
If the upstream trace contains a packet absent downstream, investigate that interval and the two capture paths. If both traces omit it, move closer to the sender or inspect sender evidence. Neither pattern alone proves a specific switch is faulty.
Report the scope of the conclusion
Wireshark’s RTP analysis derives loss from sequence numbers and offers timing statistics. Record the chosen stream and capture interval with any percentage. Distinguish a gap, reordering, duplicate capture and packets that arrived too late for the receiver’s playout policy.
After a network correction, repeat the same capture comparison and a listener test. Preserve the raw files privately, while sharing a minimal redacted result that says where packets were observed and what remains uncertain. Avoid a confident site-wide loss rate from one incomplete trace.
Watch the explanation
Explains how the problem determines where to capture, including switch mirroring and paired client/server observations. A useful first step before collecting a VoIP trace.
Read applicability and editorial notes →Watch this video here
Recorded in 2021; capture-placement principles remain useful. Exact operating-system and switch controls vary. Review used the available transcript and primary references; audio and screen readability remain unverified.

The player loads only when you choose Watch here. Playback uses YouTube’s privacy-enhanced embed; YouTube processes playback data.
Demonstrates selecting an interface, writing captures to disk and rotating a ring buffer. Helpful when a GUI capture is impractical or an intermittent fault needs a longer observation window.
Read applicability and editorial notes →Watch this video here
The capture concepts still apply; Windows and macOS path examples are from 2021. Review used the available transcript and primary references; audio and screen readability remain unverified.

The player loads only when you choose Watch here. Playback uses YouTube’s privacy-enhanced embed; YouTube processes playback data.
Sources & applicability
Primary references for the technical details above. Operational examples and planning checklists are VoIP.info editorial guidance.
- Wireshark: RTP stream analysis ↗
- Wireshark: capture files and ring buffers ↗
- tcpdump: capture statistics and options ↗
Examples require adaptation to your topology. No live PBX or hardware testing is claimed.